The van de Graaff generator is a simple device designed to create large voltages with low current. It can be used to dynamically demonstrate several physical concepts, including: electrostatics, conservation of charge, conduction, and ionization.
Which Van de Graaff is right for you?
There are two types of van de Graaff generators
- Works off a high voltage power supply.
- Works by using a belt and roller system to remove electrons from the air between the brush and the belt and transfer the charge to the dome.
- Uses a motor to turn the belt
- Uses a hand crank to turn the belt
hBARSCI sells only the belt and roller type
The van de Graaff with a motor are easier to operate, however it is easier for students to conceptually understand the hand crank type van de Graaff generator.
The following products are listed in order from smallest to largest sphere size. The larger the sphere size, the larger the voltage that van de Graaff generator is able to store.
Additional parts for this model:
PH0920B - Spare belt for PH0920A
PH0920C - Complete Assessories for PH0920A

Additional parts for this model:
PH0918B Spare belt for PH0918A
PH0918C Complete Assessories for PH0918A

Additional Parts for this Model:
PH0919B Spare belt for PH0919A
PH0919C Complete accessories for PH0919A

Additional Parts for this model:
VDGCORD Replacement connecting cord for Van de Graaff
Safe Handling of Apparatus:
- Persons with cardiac pacemakers should never operate the van de Graaff generator.
- Do not run the device near operating computer or electronic equipment.
- The van de Graaff generator is designed to produce high voltages using currents too low to cause serious injury. However, always exercise caution when using the generator to avoid painful or surprising sparks.
- Always discharge the device between demonstrations using the included discharge wand.
- DO NOT USE with Leyden jars to avoid injury.
- Place the Van de Graaff generator on a non-conducting surface, away from metal objects, electronics, devices that store things magnetically, etc. A clean and clear lab table is best.
- Set your Van de Graaff generator as far away from the electrical outlet as possible, but are still able to plug the generator in. This way you won’t receive a shock to the head if you have to unplug the Van de Graaff.
- Always discharge the collector dome between experiments and when you are finished. Use the discharge wand for this. Connect the alligator clip to a gas main or similar grounded object. Hold the discharge wand by the handle. Do not touch the grounding strap when discharging the generator. The voltage is so high that the current can pass through the insulation into your hand.
- The motor produces a lot of heat that could damage the belt or the motor itself. Do not run the generator continuously for long periods of time. Turn it off when not in use. This is an expensive device and we should try to keep it operating perfectly for a long time.
- Leave the upper and lower combs alone. They are not supposed to touch the belt. Do not bend them or mash them. They were working fine when last tested and do not require any adjustment.
- Keep the entire device clean and dry. Dust and moisture degrade the generator's performance.
- Handle the aluminum parts with care. The collector, housing, and discharge wand are easily dented. The collector already has a sizable ding in it from and accidental drop of only three inches!
Maintenance and Care:
Store the generator in a dry, dusty-free environment under a polythene cover. Keep the device dry even on wet, humid days.
To prolong the life of the belt, run the generator for only short periods of time and ensure that the brushes are not in direct contact with the belt.
Brush Adjustments:
If needed, the top and bottom aluminum mesh brushes can be adjusted. Simply loosen the two screws on the bracket, slide the brush to adjust, and retighten the screws. Always leave some space between the brush and the belt.
Band Replacement:
Replacement belts can be ordered from the dealer and should be installed by qualified persons. When replacing the belt, take care not to bend the bottom brush.
Cleaning:
The van de Graaff generator should be lightly dusted regularly with a clean, dry cloth. Occasionally, it may be necessary to use a small amount of a methylated spirit/rubbing alcohol to clean the collector dome and top brush. For the dome, remove it from the apparatus before wiping with a clean cloth and small amount of solvent. Be sure that the solvent evaporates before replacing the dome onto the apparatus. To clean the top brush, remove it by unscrewing the screws and be sure the solvent evaporates before reinstalling. As always when replacing the brush, position it so that there is a small air gap between the brush and the belt.
Next restore, renew, or replace your belt.
Sometimes condensation can form on an older belt. To remove moisture from the belt, remove belt from the generator and place in a plastic bag with a small amount of talcum powder. Shake the bag until the belt is coated. Then remove the belt and wipe the belt with a clean dry paper towel.
Scrape oxidation off the inside of the belt and replace.
DO NOT dry belt with hair dryer, this will damage the belt.
If your belt is more than a year old, a new belt (which is also less than a year old, and has been stored in a plastic bag or saran wrap) may help improve performance of your generator.
Troubleshooting: How to make my generator work most affectively
Is it humid out? A relative humidity of 60% or greater can seriously affect the amount of voltage collected on the sphere. If the humidity is above 70% relative humidity, it may be better to save your experiments for another day.
If you want to use your van de Graaff generator on a humid day, a simple hair dryer applied to the bottom and top rollers for 5-15 minutes each can improve the amount of charge collected on the dome.
Is your generator new? If your van de Graaff generator is not new, the follow steps may help to improve the performance of your van de Graaff generator.
First clean your dome and collecting brush as explained under maintenance and care.
Check your pulleys:
The felt can wear away on some bottom pulleys, replacing them if they are worn can help improve the charge on the collecting dome/sphere.
Sometimes dirt and grime can collect on the pulleys as the electric charge on them pulls pollutants out of the air. Replacing a grimy pulley will help produce a better charge.
Is the generator producing a weak charge?
Check to make sure that your charge is not leaking onto any nearby surface. There should not be anything near the charge collecting dome while the dome is being charged. Make sure nothing is hanging from the ceiling, no one is standing too near to the generator, there is nothing on the table or wall next to the generator, that the discharge wand is not touching the generator’s dome.
Are you holding a fingertip near the dome and getting only a small spark? Try a flatter surface to allow more charge to build up. Use the back of your wrist, your arm, a mixing bowl, or a discharge wand. You may need to hold something up to the dome while the generator is running for up to ten minute to get the generator to start producing a sizable spark.
Check your dome for dents, protrusions or tiny burrs. Even small irregularities in the dome can cause the charge to leak off the dome. Cover an burr with a thick layer of silicon caulk if you can’t remove it to prevent charge from leaking off.
Fine tuning of your van de Graaff:
Connect a microamp meter from the top brush to the bottom brush of your generator. Position the combs so that the maximum current is being read on the microamp meter. Maximum current is usually between 5-20 microamps.
How does a van de Graaff generator work?
This short tutorial gives the basic theory behind how a van de Graaff can build up all that charge. Understanding this will help you to troubleshoot some problems you may encounter with your van de Graaff.
Triboelectric Effect (“Charging by Friction”)
Most static electric phenomena can be explained by the triboelectric effect, which affects both conductors and insulators. In this effect, two neutral objects touch or are rubbed together so that electrons can pass between them. Some objects give up electrons easily and others hold on to them tightly. The triboelectric scale is used to rate the natural tendency of materials to give up electrons: objects that lose electrons easily are “positive,” those that hold on to them tightly are “negative.” Notice that this property is not the same as conductivity, which measures how easily electrons move within a given object. When amber (negative on the triboelectric scale) is rubbed with a piece of wool (positive on the triboelectric scale), the wool gives some of its electrons to the amber and both emerge with a net charge.

Notice that charge is merely exchanged between the amber and wool and that the total charge stays the same.
Ionization
The van de Graaff generator also demonstrates ionization of air. Ionization occurs when the electric field strength becomes strong enough to strip electrons from atoms in the surrounding air. When the electrons recombine with the positive ions in new combinations, visible light is released.
How the van de Graaff Generator Accumulates Charge
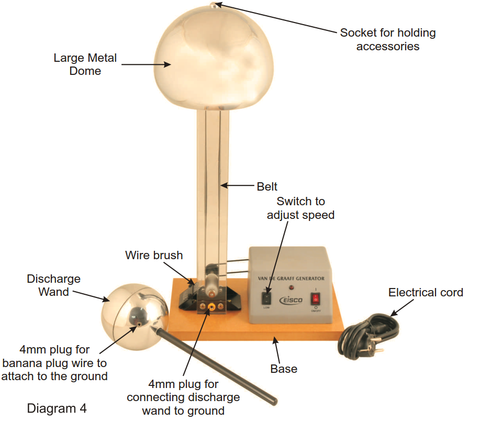
The van de Graaff generator uses an insulating belt turning on two rollers to carry charges from the bottom of the apparatus to the top and deposit them on the collecting dome.

As the lower roller is turned by the motor/crank, charges between the roller and the belt begin to be transfer due to the triboelectric effect. The roller steals electrons from the belt and so the roller acquires a net negative charge while the belt acquires a net positive charge. The concentrated negative charges on the stationary roller repel negatively charged electrons on the brush (mesh metal square), leaving positive charges near the brush tips.
The electric field created from the negative charges on the stationary (but rotating) roller ionizes the air between the brush and roller, creating positive ions and free electrons. The positively charged ions are drawn toward the negatively charged roller, but run into the insulating belt on their way towards it and get attached to the insulating belt. The belt therefore now has a supply of positive charges that it carries to the top of the apparatus. When the discharge wand is connected to the bottom of the apparatus, negative charges from the ionized air are collected by the discharge metal mesh and try to move as far away from each other as possible, spreading out over the discharge wand if allowed.
Top Roller
At the top of the apparatus there is another roller and brush and a similar process occurs. The positive charges carried up the belt attract electrons in the top brush. The electric field ionizes the air between the brush and the roller/belt. The positively charged ions are repelled by the positive charges on the belt and attracted to the electrons near the tip of the brush. The conducting collecting sphere is connected to the top metal brush and collects the accumulating positive charge.

Charges are also transferred between the top roller and brush due to the triboelectric effect. Whether the roller gains a positive or negative charge depends on the material properties of the top roller. The free electrons in the ionized air are attracted to the positive charges on the belt and, depending on whether the roller has a positive or negative net charge, this effect can be enhanced. As the belt returns to the bottom it carries either no charge or a net negative charge, depending on the material properties of the roller.
Charge Accumulation and Discharge
As the motor turns the belt, the apparatus continues accumulating charges onto the collecting sphere until a surface maximum is reached. When this occurs, the high voltage from the charged conductor breaks down the air surrounding the top of the device. The conductor will discharges through any nearby object. When the discharge wand is brought near the collecting sphere, the conductor discharges and a small “lightning” strike can be observed. As the device discharges, it ionizes the surrounding air, stripping air atoms of their free electrons. Unlike at the bottom and top of the van de Graaff generator, though, here we do not transport the separated charges away and the electric field is much stronger. They can therefore recombine and, when they do, emit the light we observe.


